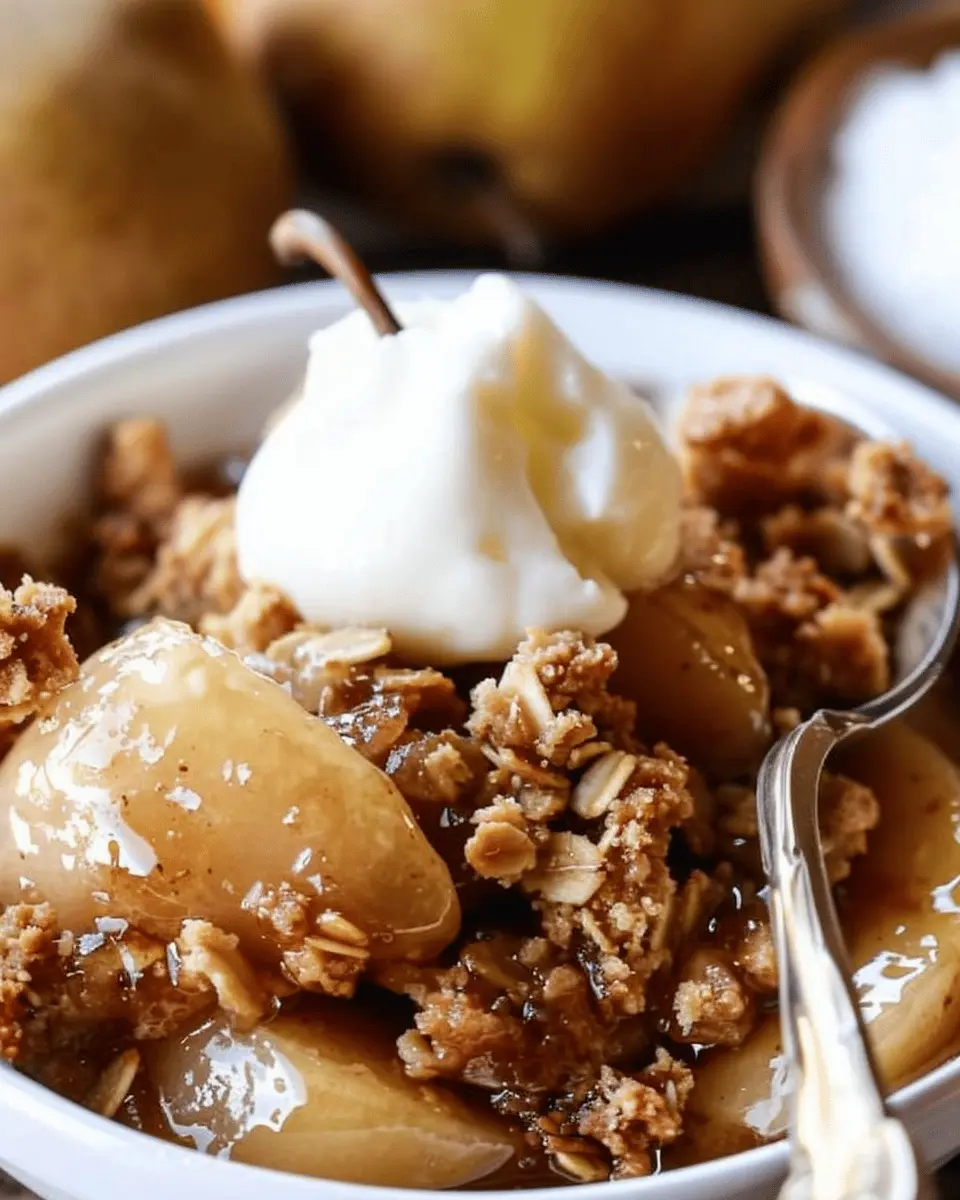
Introduction to Pear Crisp
When life gets busy, it can be oh-so-tempting to reach for fast food desserts that promise instant gratification. But have you ever stopped to consider the beauty of homemade treats like pear crisp? Not only does this delicious dessert bring warm, cozy vibes to your kitchen, but it also provides a wholesome alternative that can be made from scratch with fresh ingredients. It’s simple, quick, and genuinely satisfying, making it an ideal choice for anyone looking to indulge without the guilt.
One reason the pear crisp stands out as a fantastic alternative is its ability to incorporate the natural sweetness of ripe pears. These juicy gems are not only delicious but are also packed with vitamins, fiber, and anti-inflammatory properties. According to the USDA, just one medium pear provides around 6 grams of fiber and can be a healthy option to satisfy your sweet tooth. Pair that with a crumbly topping made from oats, nuts, and a dash of cinnamon, and you have a dessert that feels indulgent while being good for you.
Moreover, the process of making pear crisp from scratch can be an inspiring creative outlet. Maybe you recall the last time you felt a sense of achievement in the kitchen? You get to choose your ingredients, adjusting the sugars, spices, and textures to your liking. Plus, it’s a great way to experiment with flavors—imagine adding a touch of ginger or a scoop of your favorite ice cream on top!
Another appealing factor of pear crisp is its versatility. Whether you are hosting friends or just enjoying a relaxing evening at home, this dessert can easily adapt to any occasion. You can serve it warm, topped with a dollop of yogurt for a healthy treat or a scoop of ice cream for those occasions when you want to indulge.
So why settle for a drive-thru dessert when you can whip up a bowl of comforting pear crisp in no time? Say goodbye to artificial flavors and preservatives, and hello to a dessert that tastes like a hug.
For more delicious ways to enjoy fruits, check out this article on the benefits of seasonal fruits.
Ingredients for Pear Crisp
Creating the perfect pear crisp starts with gathering the right ingredients. Let’s break it down into two main components: the filling and the topping.
Essential Ingredients for the Filling
For a delicious filling that highlights the natural sweetness of pears, you’ll need:
- Fresh Pears: About 6 medium-sized, ripe but firm pears. Bosc or Bartlett varieties work wonderfully.
- Granulated Sugar: Around 1/2 cup to enhance sweetness.
- Lemon Juice: 1 tablespoon to balance the flavors and prevent browning.
- Ground Cinnamon: 1 teaspoon for that warm, cozy flavor.
- Nutmeg (optional): A pinch to elevate the taste profile.
These basic ingredients come together to invoke that nostalgic autumn feeling. If you want to learn more about choosing the best pears, check out this guide.
Necessary Ingredients for the Topping
The topping is where your pear crisp truly shines! Here’s what you need:
- Oats: 1 cup of rolled or quick oats for texture.
- All-Purpose Flour: 1/2 cup to bind the topping together.
- Brown Sugar: 1/2 cup for a rich, caramel-like sweetness.
- Butter: 1/3 cup, melted, or you can substitute with coconut oil for a vegan option.
- Chopped Nuts (optional): A handful of walnuts or pecans for added crunch.
Mix these ingredients well, and you’ll have a golden, crispy topping that contrasts beautifully with the soft, juicy pears below. Ready to dust off that baking dish? Your pear crisp will be the star of the table!
Preparing Pear Crisp
Making a pear crisp is a delightful way to celebrate the sweet, juicy flavors of fresh pears. This comforting dessert is perfect for a cozy gathering or just a quiet evening at home. Let’s walk through the process together, ensuring you have all the tips and tricks to create a pear crisp that’s both delicious and memorable.
Gather and Prepare Your Ingredients
Before diving into this scrumptious dessert, it’s essential to gather everything you’ll need. Here’s what you should have on hand:
- Fresh pears: About 6 cups, peeled and sliced. Bartlett or Anjou pears work beautifully for this recipe.
- Granulated sugar: For sweetening the filling.
- All-purpose flour: This will help bind the filling.
- Brown sugar: For that extra depth of flavor in the topping.
- Old-fashioned oats: To provide texture and crunch.
- Butter: Unsalted, melted for the topping mixture.
- Cinnamon and nutmeg: Just a pinch of each for warmth.
- Lemon juice: This adds brightness and complements the sweetness of the pears.
Make sure to wash your pears thoroughly before slicing them. If you want to elevate your dish, consider checking out How to Select the Best Pears, which can offer some fantastic insights.
Prepare the Topping Mixture
Now that your ingredients are ready, let’s make the irresistible topping for your pear crisp. In a medium bowl, combine:
- 1 cup of old-fashioned oats
- 1 cup of all-purpose flour
- 1 cup of brown sugar
- 1 teaspoon of cinnamon
- A pinch of salt
Once these dry ingredients are mixed well, add in ½ cup of melted butter. Stir until everything is evenly coated, and the texture resembles coarse crumbs. This topping is what makes your pear crisp shine, offering that perfect crunch against the tender pears.
Mix the Filling and Add the Pears
Moving on to the filling! In another bowl, combine your sliced pears with:
- ½ cup of granulated sugar
- 2 tablespoons of all-purpose flour
- 1 teaspoon of lemon juice
- A sprinkle of nutmeg (if you like a touch of spice)
Gently toss the pears in this mixture, ensuring they are well coated. The flour helps thicken the juices released during baking, making for a delightful contrast with the crisp topping.
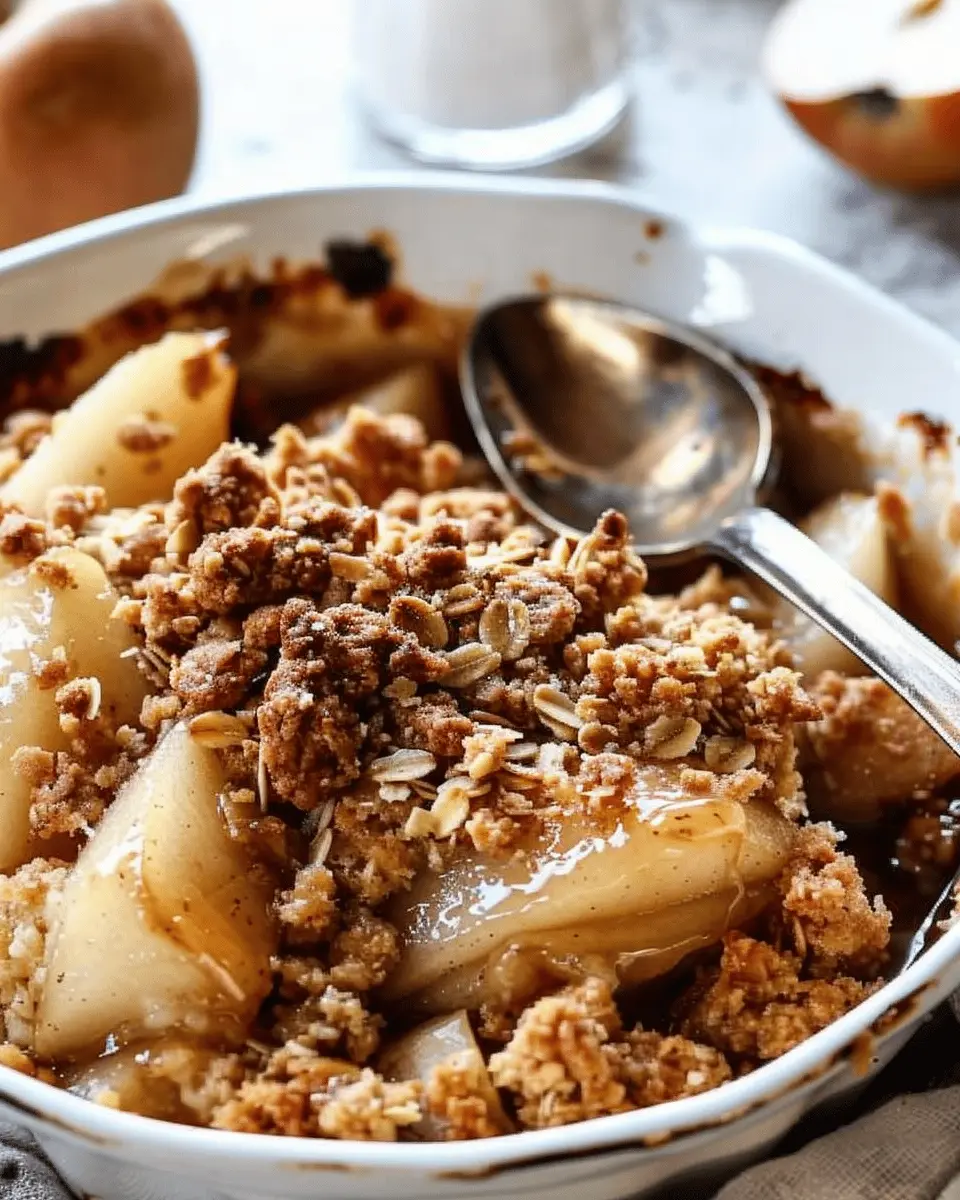
Assemble the Crisp
Now comes the fun part—layering everything! Grease a baking dish (about 9×13 inches works well) and spread your pear mixture evenly at the bottom. Then, generously sprinkle your topping over the pears. There’s no need to press it down; let it be fluffy and light for that perfect texture.
Bake to Perfection
Preheat your oven to 350°F (175°C) and once it’s ready, pop your pear crisp in for about 45 to 50 minutes. You’re looking for a golden-brown topping and some bubbling around the edges. The aroma wafting through your kitchen will be intoxicating—get ready to dig in!
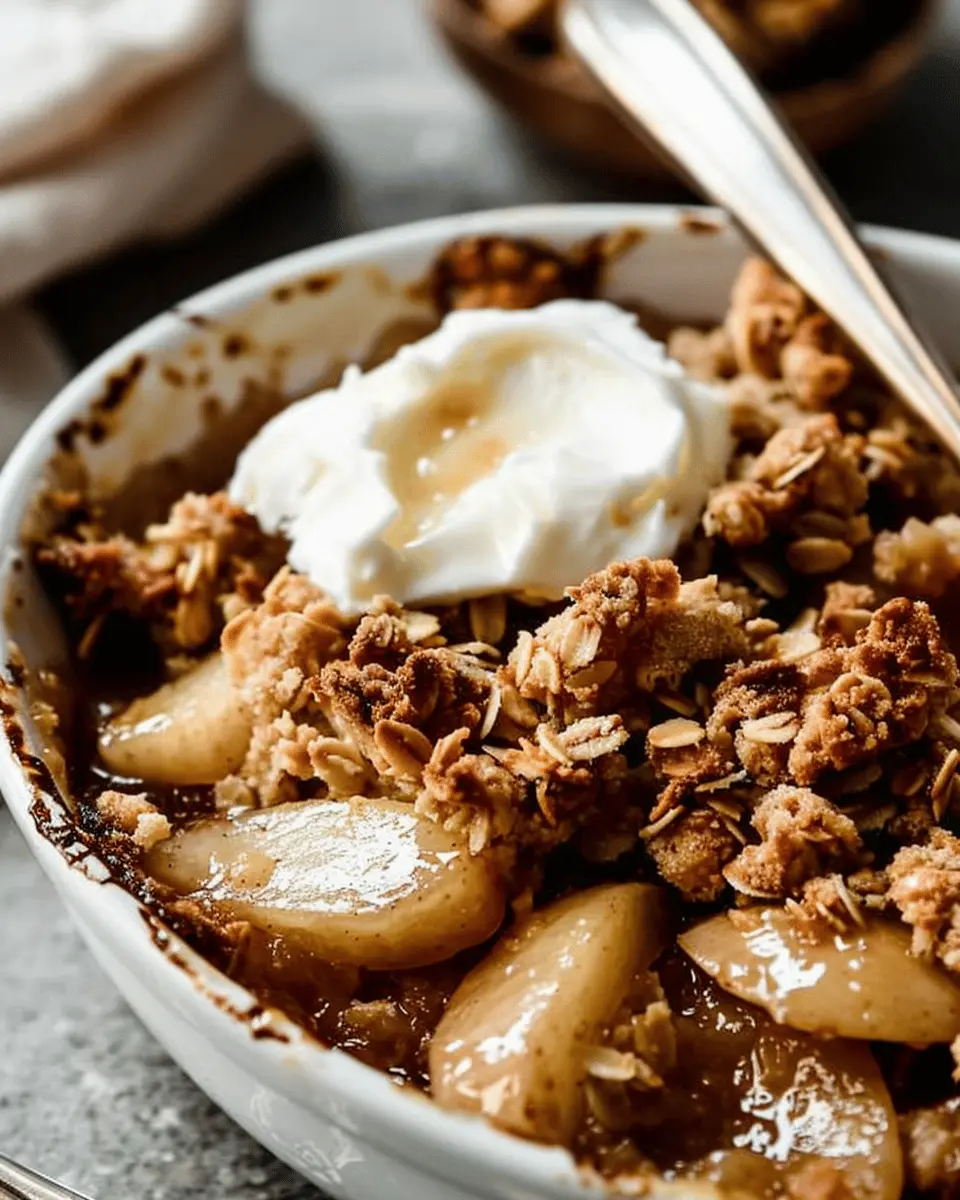
That’s it—simple, right? Let your pear crisp cool for a few minutes before serving, allowing the delicious flavors to meld together. It’s wonderful on its own but pairs excellently with vanilla ice cream or whipped cream for a touch of indulgence.
Enjoying a homemade pear crisp is not just a dessert; it’s a culinary experience that brings people together. So gather your friends or family and savor the delightful flavors of your creation! For more tips on perfecting desserts, check out this guide on baking basics to elevate your kitchen game even further. Happy baking!

Variations on Pear Crisp
When it comes to pear crisp, there’s so much room to get creative! Let’s explore some tasty variations that will elevate this classic dessert.
Spiced Pear Crisp with Added Flavors
If you’re looking to warm up your pear crisp with a little spice, consider adding flavors that enhance the natural sweetness of pears. Try incorporating:
- Cinnamon and Nutmeg: These warm spices bring a homey flavor that pairs beautifully with tender pears.
- Ginger: Fresh or ground ginger can add an invigorating kick. A teaspoon of grated fresh ginger can work wonders!
- Vanilla Extract: A splash of vanilla can deepen the flavor profile, making your crisp even more comforting.
For the ultimate experience, experiment with a touch of orange zest or even a splash of apple cider in your pear filling. The result? A pear crisp that’s bursting with complexity!
Nut-Free Pear Crisp Option
For those with nut allergies or simply seeking a lighter version, creating a nut-free pear crisp is a breeze. Here’s how:
- Replace Nuts with Seeds: Use pumpkin or sunflower seeds for that delightful crunch. They’re super nutritious too!
- Oats and Flour: Stick with rolled oats and a mix of all-purpose flour to form your crumble topping. You can even opt for whole wheat flour for added health benefits.
To ensure your pear crisp is truly nut-free, always double-check ingredient labels, especially for processed items.
Experimenting with variations is a fun way to make this dessert your own. Have you tried any unique twists on pear crisp? If so, share your thoughts in the comments!
For more ideas on meal prep and dessert variations, check out Food52 or AllRecipes.
Cooking tips for Pear Crisp
Secret to the Best Topping
Creating the perfect topping for your pear crisp is all about balance. A mix of oats, brown sugar, and a dash of cinnamon can go a long way. Aim for a crumbly texture—this will help create that delightful contrast between the warm, juicy pears and the crispy topping. Don’t skip the butter; it adds richness that takes your pear crisp from good to exceptional. Additionally, consider adding chopped nuts like pecans or walnuts for an added crunch. Trust me, your taste buds will thank you!
Perfect Pear Selection Tips
When it comes to selecting pears for your pear crisp, opt for varieties like Bartlett, Anjou, or Bosc. These are juicy and tender, perfect for baking. Look for pears that are slightly firm but yield to gentle pressure—this indicates ripeness without mushiness. If you need more guidance, check out resources like the Purdue University Extension for expert advice on fruit selection. Remember, the fresher the pear, the better the crisp!
With these tips, you’re well on your way to impressing friends and family with a delicious homemade treat. Happy baking!
Serving suggestions for Pear Crisp
Pairing with ice cream or yogurt
One of the best ways to elevate your pear crisp experience is to serve it warm alongside a scoop of vanilla ice cream or a dollop of creamy yogurt. The contrast of temperatures creates a delightful sensation, while the creamy element complements the sweetness of the pears beautifully. Try a tangy Greek yogurt for a healthier twist—its richness pairs wonderfully with the warm, buttery topping. If you’re feeling adventurous, consider adding a sprinkle of cinnamon or nutmeg on top for extra warmth.
Creative ways to enjoy leftovers
Leftover pear crisp doesn’t have to languish in the fridge! One fantastic idea is to transform it into a breakfast treat. Top a bowl of oatmeal with a scoop of warmed-up pear crisp for a comforting start to your day. You can even toss it into smoothies for a deliciously unique flavor boost. Another fun way is to use it as a filling for crepes or pancakes, bringing an unexpected twist to your brunch spread.
For more unique ideas, check out The Kitchn for inspiration!
Time breakdown for Pear Crisp
When it comes to making a delicious pear crisp, understanding the time commitment helps you plan ahead. Here’s a breakdown of what to expect:
Preparation time
Getting your kitchen ready and gathering ingredients will take approximately 15 minutes. This includes slicing your fresh pears, mixing the topping, and preheating the oven.
Cooking time
Once you pop your pear crisp into the oven, it’ll need about 30-35 minutes to bake. The result will be a golden, bubbling delight that fills your kitchen with heavenly aromas.
Total time
In total, you’re looking at around 45-50 minutes from start to finish. Perfect for a weeknight treat or a cozy weekend dessert with friends!
For more detailed tips on baking with pears, check out this guide on selecting the best varieties!
Nutritional Facts for Pear Crisp
Calories per Serving
If you’re curious about indulging in a delicious serving of pear crisp, you’ll be happy to know it typically clocks in at around 200-250 calories per serving. This can vary depending on the amount of added sugar or butter, so you have some flexibility to tailor it to your taste and health goals.
Breakdown of Key Nutrients
When savoring this delightful treat, it’s important to consider the nutritional components that come with it:
- Fiber: Pears are a fantastic source of dietary fiber, which is essential for digestion and can help you feel full longer.
- Vitamins: You’ll benefit from vitamin C, which enhances your immune system and supports skin health.
- Carbohydrates: Pear crisp provides a good ratio of carbs for energy, especially useful after a workout or long day.
- Fats: The fats primarily come from oats and any added nuts, which can be heart-healthy when chosen wisely.
Incorporating pear crisp into your dessert repertoire can be both a tasty and nutritious choice! For additional insights on the health benefits of pears, check out resources from the USDA or Healthline.
FAQs about Pear Crisp
Can I use other fruits in my pear crisp?
Absolutely! While pear crisp is delightful on its own, mixing in other fruits can create a unique twist. Popular fruits to combine with pears include apples, berries, and peaches. Each fruit adds its own flavor profile; for instance, tart apples can provide a nice contrast to the sweetness of pears. If you’re feeling adventurous, try adding some dried fruits like cranberries or cherries for an unexpected zing.
How do I store leftover pear crisp?
Storing leftover pear crisp is simple! Allow it to cool to room temperature, then cover it tightly with plastic wrap or transfer it to an airtight container. You can keep it in the refrigerator for up to 3 days. For longer storage, consider freezing it. Just remember to wrap it well to prevent freezer burn. When you’re ready to enjoy it again, reheat it in the oven for best results, allowing the topping to regain its crispness.
Can I make pear crisp ahead of time?
Definitely! Prepping your pear crisp ahead of time is a great way to save time on busy days. You can assemble the dish and refrigerate it before baking. It will be ready to pop into the oven whenever you want a warm dessert. Just remember, if you’re making it the day before, hold off on adding the topping until you’re about to bake it to maintain that delightful crunch!
For more delicious recipes and tips on fruit crisps, check out this site for inspiration!
Conclusion on Pear Crisp
Embracing Homemade Desserts with Pear Crisp
As you wrap up your culinary journey with pear crisp, you might find that embracing homemade desserts can be both satisfying and rewarding. This delightful dish not only highlights the juicy sweetness of pears but also showcases your ability to create something scrumptious from scratch.
Imagine gathering friends or family around the table, sharing stories while enjoying your warm, fragrant pear crisp topped with a scoop of ice cream—it’s a heartwarming experience that store-bought desserts simply can’t replicate. Plus, making it at home allows you to experiment. Want to add some oats or different spices? Go for it!
For more tips and recipe inspiration, check out Taste of Home and Bon Appétit. Happy baking!
PrintPear Crisp Delight: Easy Dessert for Cozy Nights
Indulge in a warm and comforting Pear Crisp that’s perfect for a cozy evening. This easy dessert is made with ripe pears and a buttery crumble topping, making it a delightful treat.
- Prep Time: 15 minutes
- Cook Time: 35 minutes
- Total Time: 50 minutes
- Yield: 8 servings 1x
- Category: Dessert
- Method: baking
- Cuisine: American
- Diet: vegetarian
Ingredients
- 4 cups sliced pears
- 1 cup rolled oats
- 1/2 cup brown sugar
- 1/2 cup all-purpose flour
- 1/2 cup unsalted butter, melted
- 1 teaspoon cinnamon
- 1/4 teaspoon salt
Instructions
- Preheat the oven to 350°F (175°C).
- In a mixing bowl, combine sliced pears with cinnamon and salt, then place them in a greased baking dish.
- In another bowl, mix oats, brown sugar, flour, and melted butter until crumbly.
- Spread the oats mixture over the pears evenly.
- Bake for 30-35 minutes or until the top is golden brown and the pears are tender.
Notes
- Serve with vanilla ice cream for an extra treat!
- Feel free to mix in nuts or other fruits.
Nutrition
- Serving Size: 1 serving
- Calories: 250
- Sugar: 12g
- Sodium: 150mg
- Fat: 10g
- Saturated Fat: 6g
- Unsaturated Fat: 3g
- Trans Fat: 0g
- Carbohydrates: 36g
- Fiber: 4g
- Protein: 2g
- Cholesterol: 15mg
Keywords: Pear Crisp, Dessert, Cozy Nights